Layer Styles
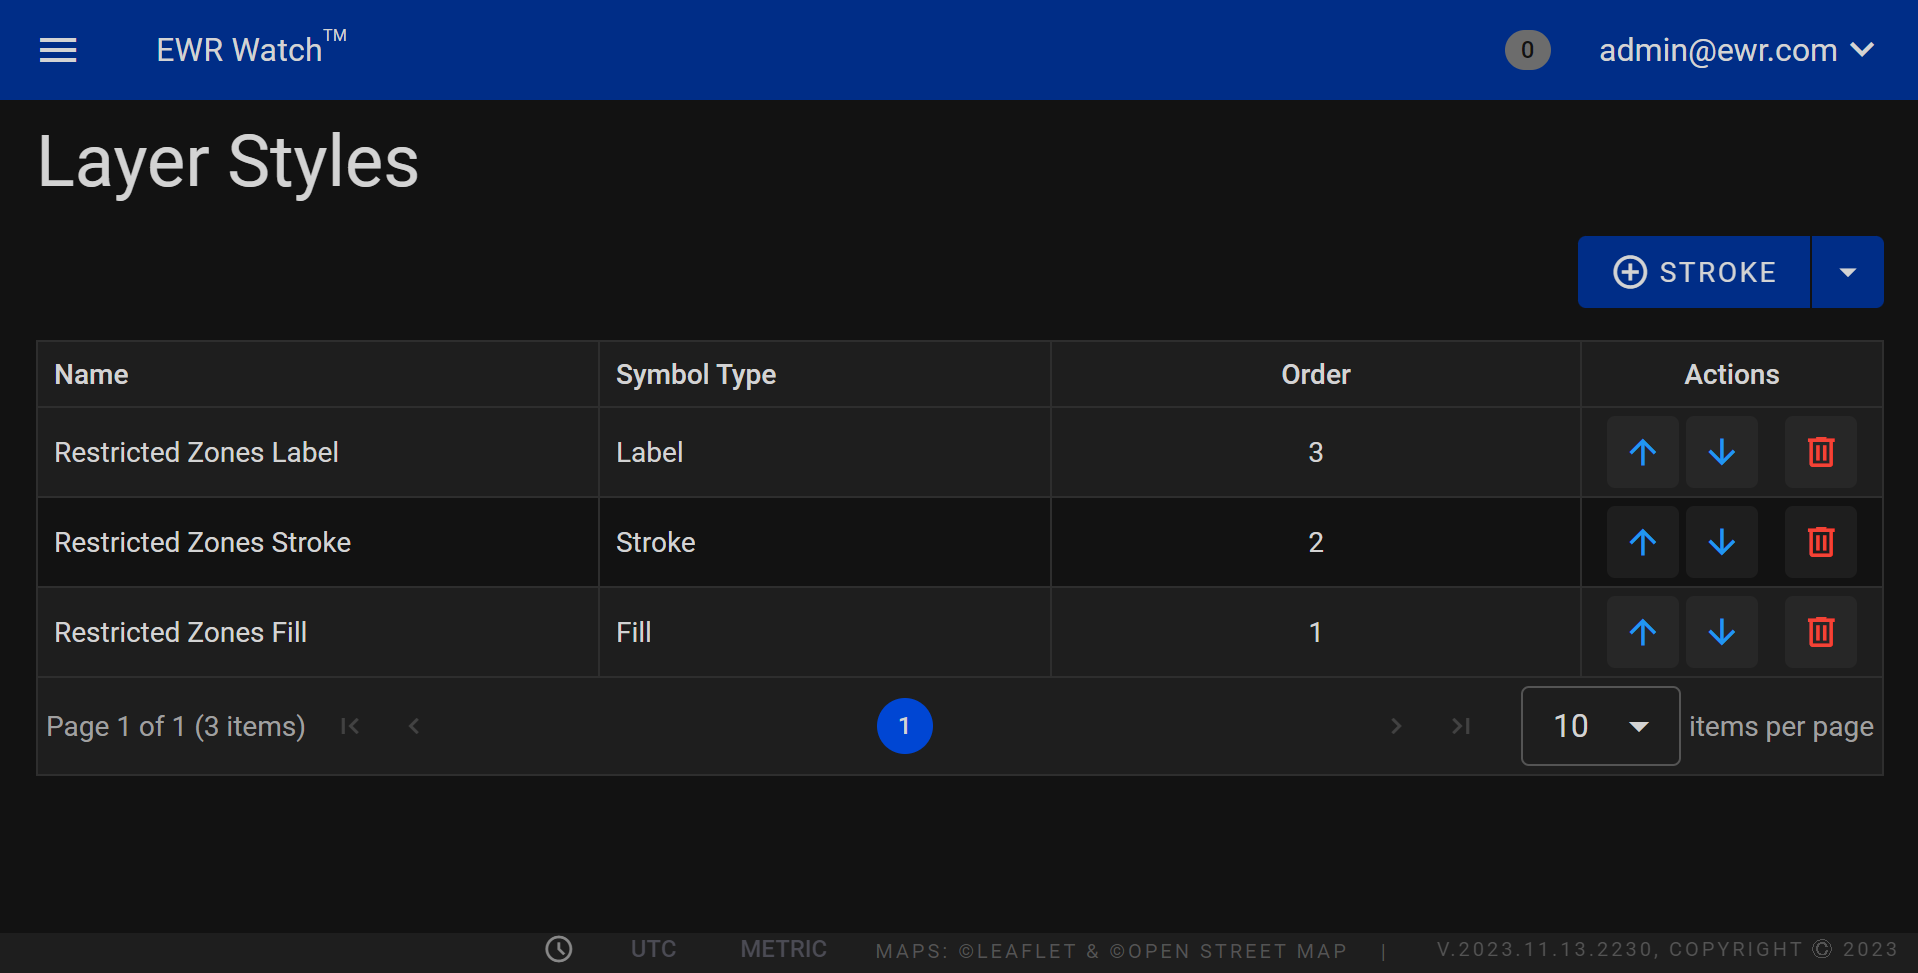
Welcome to the Layer Styles Page, your comprehensive guide to understanding and applying layer styles in our program. This page is designed with a user-friendly layout, featuring four distinct columns: Name, Symbol Type, Order, and Actions. Each column serves a specific purpose to help you navigate and utilize layer styles effectively.
Data Grid
Columns
1. Name:
In this column, you'll find the names of various layer styles available in our program. These names represent unique visual effects that can be applied to your layers, enhancing the overall appearance of your designs.
2. Symbol Type:
This column categorizes layer styles based on their symbol types, providing you with a quick reference to understand the visual impact each style creates. Whether it's shadows, glows, bevels, or other effects, the symbol type column helps you identify the nature of the style at a glance.
3. Order:
The order column indicates the sequence in which layer styles are applied to your elements. Understanding the order of application is crucial as it determines how styles interact with each other, allowing you to achieve desired visual effects seamlessly.
4. Actions:
Here, you'll find a concise description of the actions you need to perform to apply a specific layer style to your design elements. Whether it involves a simple click, drag, or adjustment of parameters, the actions column provides clear instructions to guide you through the process.
Actions
-
Move Up
The "Move Up" action in map layer styles determines the drawing order of elements on a map. When you move a layer style up, it brings that specific layer to the front, ensuring it is drawn on top of other elements. This action is vital in cartography, where proper layering is crucial for creating clear and meaningful maps. For instance, moving a road layer style up would ensure roads appear above other map features, enhancing the map's readability. -
Move Down
Conversely, the "Move Down" action in map layer styles places a particular layer behind others, influencing its drawing priority. When you move a layer style down, it is drawn beneath other elements, allowing for proper stacking of map features. This functionality is essential in creating visually cohesive and informative maps. For instance, moving a water bodies layer style down would ensure that rivers and lakes appear behind roads and city labels, maintaining a realistic map representation. -
Delete
The "Delete" action in map layer styles removes a specific layer style from your map composition. This action is permanent and should be used with caution. Deleting a layer style eliminates the associated map feature, altering the map's visual representation. Exercise care when using the "Delete" function, as it directly impacts the map's content and layout.
Adding

Stroke
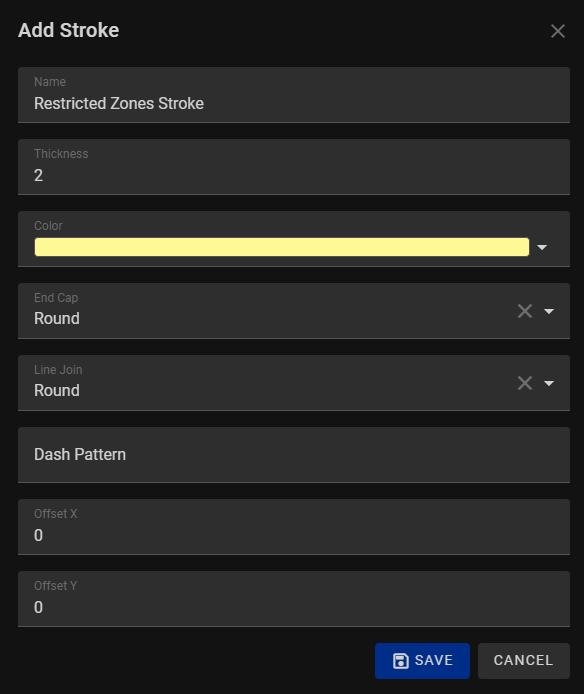
When adding a stroke to your shapes, lines our program, you have the flexibility to create customized line styles tailored to your specific design needs. Upon selecting the "Add Stroke" option, a dialog box will appear, providing you with a range of options to create the stroke. Here's an overview of the available options:
1. Name:
Enter a descriptive name for your stroke style. This helps you easily identify and manage different stroke configurations within your project.
2. Thickness:
Specify the thickness or width of the stroke in units relevant to your project. This determines how bold or fine the stroke appears around your shapes or lines.
3. Color:
Choose the color for your stroke from a color picker or a predefined palette. Selecting an appropriate color ensures your stroke complements the overall color scheme of your design.
4. End Cap:
Determine how the stroke ends at the endpoints of a path. Options typically include butt, round, and square end caps, each offering a different visual effect.
5. Line Join:
Define how corners of a path are joined. Common options include round, bevel, and miter join styles, each influencing the appearance of intersecting lines.
6. Dash Pattern:
Set a custom dash pattern to create dashed or dotted strokes. Specify the length and gap values to achieve the desired pattern for your stroke.
7. Offset X and Offset Y:
Fine-tune the position of the stroke horizontally (X) and vertically (Y) relative to the object's path. This option allows for precise alignment of the stroke around the shape or text.
Fill
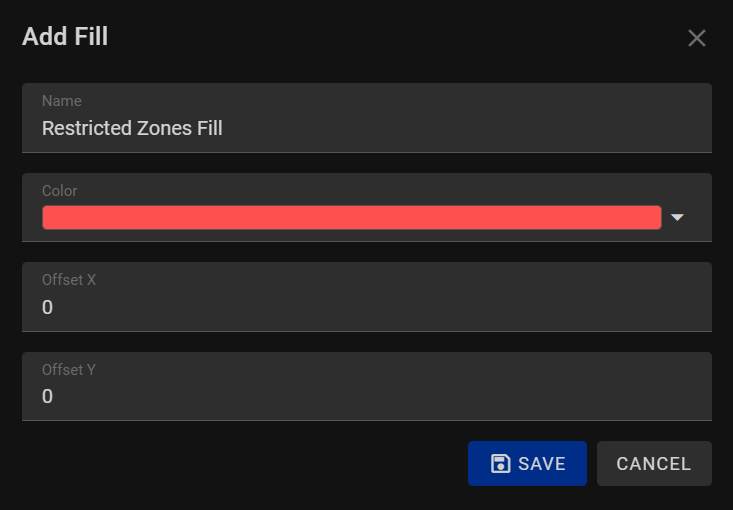
When adding a fill style to your shapes, text, or other graphical elements in our program, you have the ability to customize their interior appearance with colors. The Fill style feature allows you to define how the interior of your elements is colored, enhancing the visual appeal of your designs. Here are the available options when adding a fill style:
1. Name:
Assign a descriptive name to your fill style. Providing a clear name helps you identify and manage different fill configurations within your project, making it easier to work with multiple elements.
2. Color:
Choose a color for your fill style from a color picker or a predefined palette. Selecting the appropriate color is essential as it determines the interior hue of your shapes.
3. Offset X and Offset Y:
Fine-tune the position of the fill style relative to the object's boundaries. By adjusting the offset values horizontally (X) and vertically (Y), you can control the placement of the fill within the element. This option allows for precise alignment and positioning of the fill, ensuring it appears exactly as intended.
Label
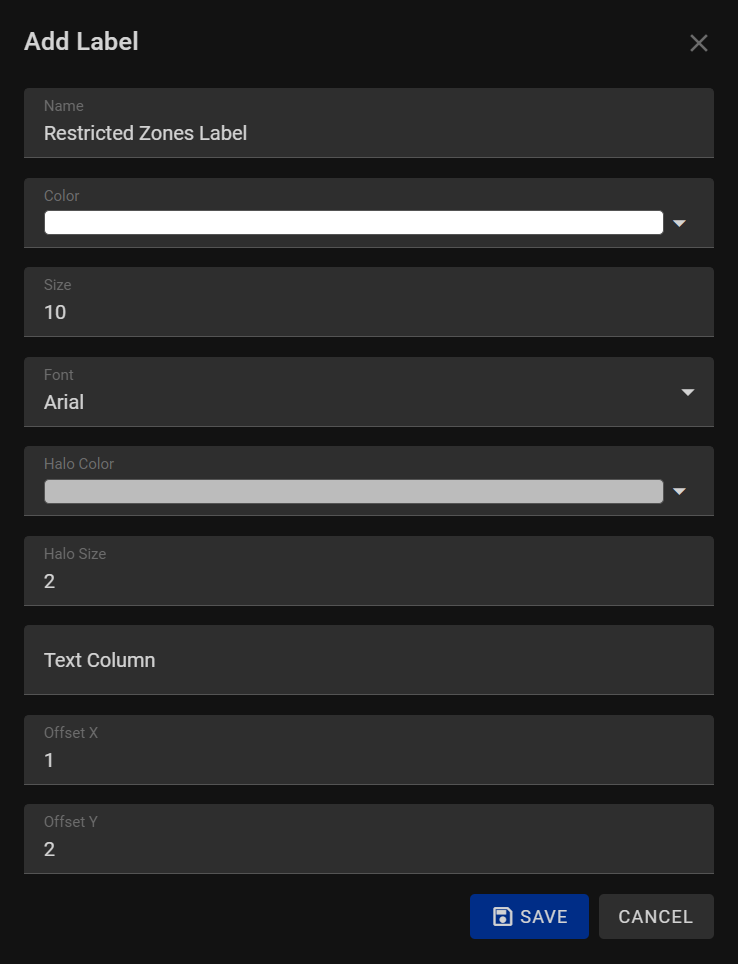
When adding a label style to your map elements, our program provides you with a range of options to customize the appearance of labels, ensuring they are visually appealing and easily readable. The Label Style allows you to create distinctive and well-designed labels for your maps. Here are the available options when adding a label style:
1. Name:
Assign a meaningful name to your label style. A descriptive name helps you identify and manage different label configurations within your project, streamlining your workflow and organization.
2. Color:
Choose a color for the text in your label from a color picker or a predefined palette. Select a color that provides sufficient contrast with the background, ensuring readability and visibility of your labels.
3. Size:
Specify the font size of your text, determining how large or small the labels appear in your design. Adjust the size to achieve the right balance between prominence and space efficiency.
4. Font:
Select a font style for your labels. Choose a font that aligns with the overall design theme and conveys the intended tone. Consider readability and compatibility with different devices and platforms.
5. Halo Color:
Set a halo color for your text labels. The halo color creates a contrasting outline around the text, enhancing its visibility against complex or busy backgrounds. Choose a halo color that provides a clear distinction without overpowering the text.
6. Halo Size:
Determine the size of the halo around the text. Adjusting the halo size allows you to control the thickness of the outline, ensuring that the text remains legible even in challenging visual environments.
7. Text Column:
Specify the data source or attribute column containing the text content for your labels. Connect your labels to relevant data sources to dynamically update label content based on changing data sets.
8. X Offset and Y Offset:
Fine-tune the position of the labels horizontally (X offset) and vertically (Y offset) relative to their anchor points. These offset values allow precise alignment of labels, ensuring they appear exactly where you want them in relation to map features or graphical elements.
Symbol
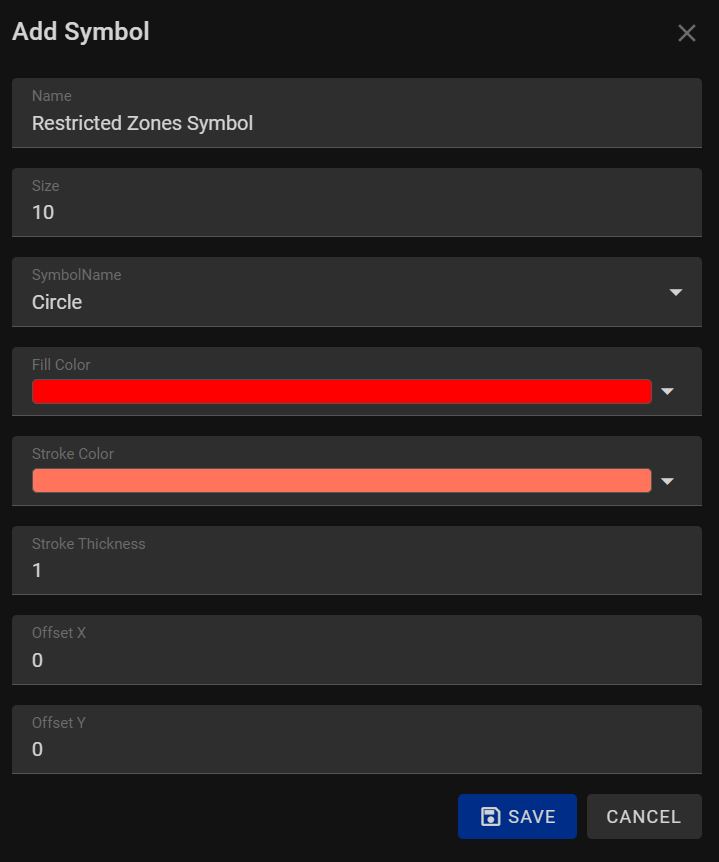
When adding a symbol to your graphics or maps, our program provides you with a variety of options to create distinctive and visually appealing graphic icons. Symbols are essential for representing specific features or data points in maps, diagrams, and other visualizations. The "Add Symbol" feature allows you to tailor the appearance of symbols to meet your design requirements. Here are the available options when adding a symbol:
1. Name:
Assign a descriptive name to your symbol. A meaningful name helps you identify and manage different symbols within your project, making it easier to work with a variety of graphical elements.
2. Size:
Specify the size of your symbol, determining how large or small the icon appears in your design. Adjust the size to ensure the symbol is appropriately scaled in relation to other graphical elements and features in your project.
3. Symbol Name:
Choose a specific symbol from a library of pre-designed icons. Selecting the right symbol is crucial for conveying the intended meaning or representation within your graphics.
4. Fill Color:
Set the fill color for the interior of the symbol. Choose a color from a color picker or a predefined palette. The fill color adds depth and vibrancy to the symbol, enhancing its visual appeal.
5. Stroke Color:
Specify the color for the stroke or outline of the symbol. A distinct stroke color helps define the boundaries of the symbol, ensuring it stands out against various backgrounds. Choose a stroke color that provides clear contrast with the fill color and the surrounding elements.
6. Stroke Thickness:
Determine the thickness of the stroke around the symbol. Adjusting the stroke thickness allows you to control the prominence of the outline, emphasizing the symbol's shape and details.
7. X Offset and Y Offset:
Fine-tune the position of the symbol horizontally (X offset) and vertically (Y offset) relative to its anchor point. These offset values enable precise placement of the symbol within your graphics, ensuring accurate alignment with other elements.
Editing

In the Layer Styles page, users can take advantage of a convenient double-click edit feature. By simply double-clicking on a specific row, they can swiftly modify a vast array of properties associated with the layer style.